Saturday 10 December 2016

Shimmery Lavender Eyes and Nude Lips Make-Up Look

Hello Beautiful Ladies...

This make-up look took a little longer time to get finished than it usually takes me to complete my make-up but the outcome is so beautiful that you all won't regret trying this. This make-up look will look best with fake eye lashes so do try to get them on. Else, you can always apply lots of mascara. If you wanna know how I did these purple eyes and whole look then keep on reading the post 😘


PROCEDURE

I started by grooming my eye brows using Maybelline Master Brow Pro Palette in the shade Deep Brown and then went to the eye make-up as I did not want any eye shadow fall outs on my base. So, following were the steps for eye makeup.

STEP 1 - I prepared my eyes for makeup by applying NARS Radiant Creamy Concealer in the shade Ginger all over my upper eye area. I then set it up using MAC Studio Fix in the shade NC30 so that the eye make-up stays for a longer time.

STEP 2 - From CHI CHI Choose Chi Chi Extravaganza Face Palette I used Medium Brown shade and applied it on my crease area and a little above that as I have hooded eyes. Then again on the crease area applied NYX Primal Colors Eye Shadow in the shade Hot Fuchsia. After that, I applied Totally Fetch color, which is a dark fuchsia color, from Too Faced Chocolate Bon Bons Palette again on my crease area to give depth to the fuchsia color as you can see in picture 1 and 2. I blended all the colors very well and it took me some time to blend all well.


STEP 3 - Coming to the eye lids, I applied Shimmery Lavender eye shadow from CHI CHI Palette all over them. 
Chi Chi Extravaganza Face Palette
Too Faced Chocolate Bon Bons Palette


STEP 4 - Then, using the darkest purple eye shadow from CHI CHI Palette, I made a V-Shape on the outer corners of my eyes. Using a blending brush, I blended that eye shadow on my outer corners as well as on my crease area. I reapplied and blended it till I got the desired pigmentation.

STEP 4 - I drew winged eye liner using Bobbi Brown Long Wear Gel Eyeliner in Black Ink.

I did my lower lash make-up after completing my whole makeup. But I will write the steps here only to complete the eye makeup steps.

STEP 5 - On my lower lash line, I first applied NYX Primal Colors Eye Shadow in Hot Fuchsia using a blending brush. Then, on inner 1/4th part, I used that Shimmery Lavender color from CHI CHI Palette and on the rest of the lower lash line, I applied Darkest Purple color from the same palette and smudged it well.

STEP 6 - I completed the eye look by applying the gel eyeliner on my waterline, followed by fake eye lashes.


Now coming to rest of the face...

STEP 1 - I well moisturized my face using a Rosehip oil, followed by MAC Strobe Cream. I applied the strobe cream all over my face.

STEP 2 - I primed my face using Smashbox Photo Finish Foundation Primer.

STEP 3 - As I have dark circles, I used L.A. Girl Pro Conceal Orange Corrector under my eyes and also around my lips area to color correct those dark areas.
STEP 4 - Next, I applied Too Faced Born This Way Foundation in the shade Warm Beige with the help of damp Real Techniques Miracle Sponge.

STEP 5 - Then I highlighted the areas that you can see in the picture below, using NARS Radiant Creamy Concealer in the shade Ginger and blended it well using damp sponge.
Under my eyes, center of forehead, bridge of the nose, cupid's bow, center of the chin and just under the cheek contour area.


STEP 6 - I contoured my cheeks, nose, forehead and jawline first using a cream contour stick i.e. NYX Wonder Stick Highlight and Contour Stick in Universal shade and blended it well using the same damp sponge. I just keep on patting the sponge over the areas. And over that, I used the shade Sombre from Kat Von D Shade and Light Contour Palette to powder counter the areas.

STEP 7 - I baked the areas where I applied the concealer using Chi Chi Real Minerals Finishing Powder. I kept the powder on for 10 minutes and then brushed it of using MAC Studio Fix in NC30. Meanwhile, I was doing the lower lash line makeup.

STEP 8 - For blush, I used two colors. First, I applied NYX Blush in Mocha and on top of that I applied NYX Baked Blush in Pink Fetish.

Left- Mocha, Right- Pink Fetish


STEP 9 - Now, from Too Faced Chocolate Bon Bons Palette, I took the shade Satin Sheets and used it as a powder highlighter. I applied it on my cheek bones, center of forehead, bridge of nose, cupid's bow and center of the chin.

STEP 10 - And here is the final step......The Lips. I lined and filled my lips with Essence Lipliner in the shade In The Nude. Then I applied Sephora Rouge Cream Lipstick in R61 and on top of that, i applied NYX Soft Matte Lip Cream in Stockholm.

So, here is the complete look...


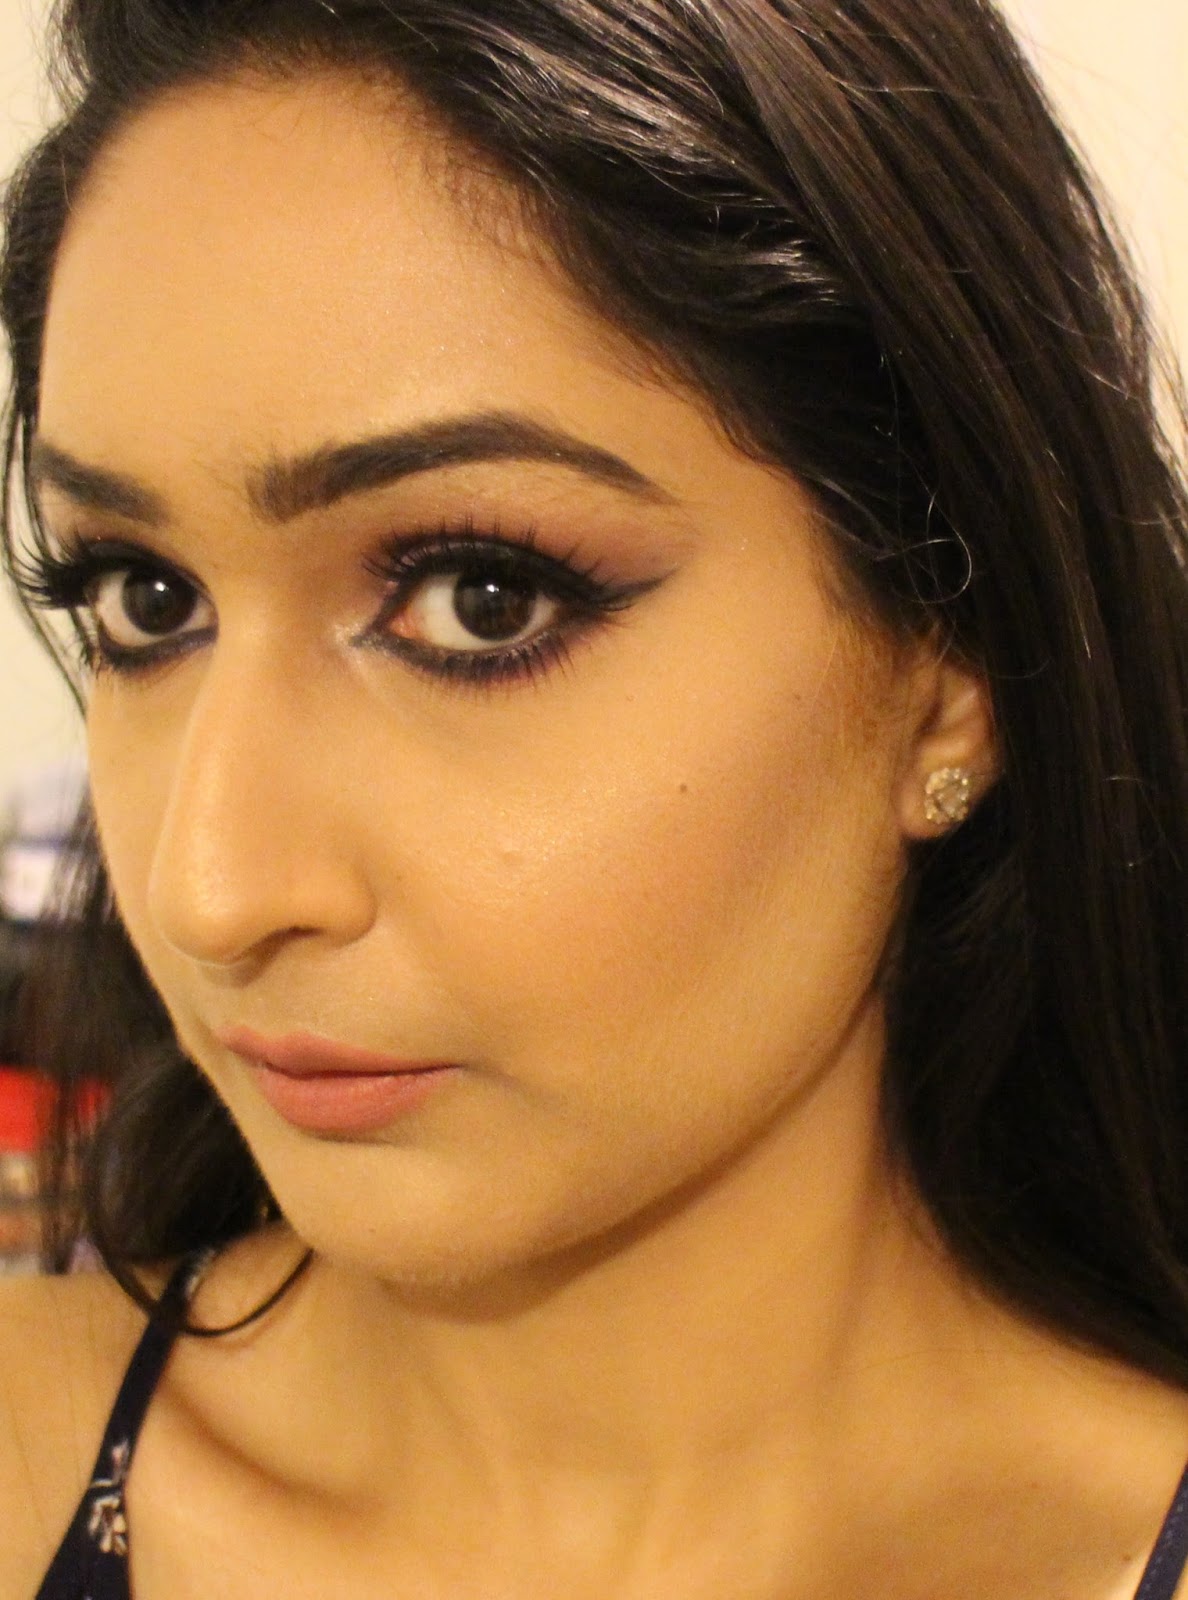
I hope you all like this tutorial and will try it out soon. Let me know what you think about it 😉. See you guys in my next post. Till then, take care 🙋

With Love
Akanksha


Wednesday 26 October 2016

Too Faced Born This Way Foundation Review

Hey Lovelies...

Today, I am going to tell you about a foundation which has changed my make-up game. I am using it for last 2 months and now ready to review it for you guys. So, you must have guessed from the title itself that I am talking about Too Faced Born This Way Foundation and my shade is Warm Beige which matches me perfectly.


PACKAGING

It comes in a transparent glass bottle with a black plastic cap. The packaging is very elegant and classy. Everything is written in golden color on it. The best thing about the packaging is that it comes with a pump dispenser. So, it is very easy to take out the product from the bottle without any wastage. You can control the quantity of the product with the pump. The box in which the foundation comes is also very cute. It's a pink, black and golden colored cardboard box. Any girl can fall in love with it <3.


WHAT THE PRODUCT CLAIMS


PRICE
AUD 57/- for 30 ml 


AVAILABILITY 
Australia - Easily available at Mecca.

India - Couldn't find it anywhere when I searched on google. I think you will have to order overseas.

MY EXPERIENCE WITH THE FOUNDATION

It would not be hard to guess for you guys that I am having great experience with this foundation. To start with, it's a very light feel, liquid foundation with a medium to full coverage.


 I don't feel as if I have applied any foundation on my skin...it is that light. This foundation blends like a dream. I like to apply it with Real Techniques Face Expert Brush. It has made the blending thing so easy that it takes a few seconds to blend it out perfectly. Before I came across this foundation, I used to apply corrector or concealer under my eyes for hiding dark circles. But this foundation conceals the imperfections so well that I have stopped using any concealer or corrector. I use them for big occasions only. And this has definitely reduced my make-up time :D. Other thing I love the most in this foundation is the dewy finish it gives to my skin. It gives a healthy glow to my skin with a natural coverage. It is perfect for my normal to dry skin. Coming to the staying power of this foundation, it stays perfectly on my face for 8-10 hours, without any touch ups. But for that, I set the foundation with a compact powder, otherwise after some time my face starts becoming oily. So, I am not sure if it will suit oily sinned beauties or not.


Before Foundation

After Foundation

After setting the foundation with face powder


In short, I must say that Too Faced Born This Way Undetectable Medium-To-Full Coverage Foundation fulfills what it claims.


Wearing this foundation in above two pictures :)


     PROS
  • Beautiful and elegant packaging
  • Comes with a pump dispenser
  • Light weight on skin
  • Medium to full coverage
  • Infused with Coconut Water, Alpine Rose and Hyaluronic Acid
  • Natural coverage
  • Gives dewy finish and healthy glow
  • Blurs the imperfections
  • 8-10 hours staying power 
  • No animal testing

     CONS 
  • On expensive side
  • Not easily available in India

OVERALL VIEW
All I can say now is that this is the best foundation I have used till now. If you have normal or dry skin, definitely give it a go. The foundation claims to be oil free so I think oily-skinned beauties can set it well with face powder to give it a try :)


RATING
5/5


With Love
Akanksha


Tuesday 18 October 2016

Karwachauth Make-Up Look 2016

Hey Everyone...

As Karwachauth is tomorrow, I created a classic Red Lips look for it as all I could think of was Red color only (for the traditional look). 


A very simple and classic make-up which is not so complicated and risky ;). If you liked the look, then keep on reading the post :).


PROCEDURE

Step 1 - I moisturized my face well and applied Smashbox Photo Finish Foundation Primer all over my face to prepare my skin for make-up.

Step 2 - Next, I applied Too Faced Born This Way Foundation in the shade Warm Beige all over my face and also on my neck with Real Techniques Face Expert Brush.

Step 3 - After that, I highlighted my under eye area, my forehead, bridge of nose, cupid's bow and chin using NARS Radiant Creamy Concealer in the shade Ginger. See the picture below for reference. Then, I blended it well using the same real techniques brush.


Step 4 - Next, I baked the highlighted areas using Chi Chi Real Minerals Finishing Powder to set the concealer perfectly and to get flawless finish. 


Step 5 - Then, I moved on to my brows. I used Maybelline Master Brow Pro Palette in the shade Deep Brown. First I used the wax from it to make my brows stay in place and then filled them up using the powder.

Step 6 - I started doing eye make-up next using Chi Chi Extravaganza Face Palette (see the picture below). I prepared my eyes with NARS Radiant Creamy Concealer to make a clean base for the eye makeup and set it with a face powder.


Taking the above picture for reference - in Step 1, I used eye shadow (1) from the Chi Chi palette and applied it on my crease area and a little above that using a blending brush and blended it well. 
In Step 2, I applied eye shadow (2) on the crease area using a blending brush and blended both the eye shadows well together.
In Step 3, I placed eye shadow (3) all over my eye lids with a flat eye shadow brush and taking the blending brush again, blended the crease area well to get a smooth finish.
Coming to the Step 4, I applied a winged liner using Bobbi Brown Gel Eye Liner in the shade Sepia Ink (brown color). 


For the lower lash line, I first applied eye shadow (1) using a blending brush, followed by eye shadow (2) again using blending brush.
Then I applied a thin line of Bobbi Brown Gel Liner in Sepia Ink on my lower lash line and smudged it well using a smudge brush to avoid to harsh lines.

I highlighted inner corners of my eyes using the highlighter from Chi Chi palette.
On my lower water line, I applied Lakme Eyeconic Kajal in the shade White to make my eyes look bigger. 


To complete the eye look, I applied false eye lashes and then applied Rimmel London Scandaleyes Show Off Mascara on my upper and lower lashes.

Step 7 - After the eyes, I sculpted my face by contouring the hollow of my cheeks, my jawline, and forehead using the Contour shade from Chi Chi palette (refer the palette picture) and blended it very well.

Step 8 - Then, I applied blush on my cheeks again from the Chi Chi palette.

Step 9 - After that, I highlighted my cheekbones, bridge of nose, forehead, cupid's bow and chin using the highlighter from Chi Chi palette.

Step 10 - Now comes the lips. It had to be MAC Ruby Woo ;).

To complete the look, I wore Red Bindi and Sindoor.


This look is perfect for day time. I hope you like this tutorial and try it on Karwachauth or other occasion :). See you all in my next post. Till then, take care :*

With Love
Akanksha

Sunday 16 October 2016

My Birthday Look

Hey Loveliess...

So where was I all this time??? Hmmm...Sorry for not posting for more than a month now. First, there was some internet problem at my place and then got really busy with my job. But it's high time now to give some time to my blog and I was missing posting here soooo much. 

Coming to the post, it was my 27th birthday on 14th of October and my 1st birthday in Perth :). And here I am, sharing some pictures of my birthday dress with you all and how I styled it. Hope you guys like it :*

PS. The dress and the handbag are birthday gifts from my hubby dear <3


As you guys can see in the picture above, it's a knee length, navy blue crochet dress with bodycon lining. There was some net attached on top of the lining (starting from the waist) to give the dress a fluffy look, which I loved the most. You can see that in picture below.


I wanted to keep the look simple and elegant so I chose to style it up with a small grey handbag, white watch and pink heels ;). I matched my lips with the footwear :p


At the back, the pattern was same as front with a long zip so that you can wear it easily.

  More happy pics for you all :D


So, that was my look for my birthday. Hope you guys enjoyed the pics. And I promise that I am back now and will stay :P. Thanks for your love and support which encourage me to keep on doing this work.

Outfit Details

Dress - Forever New (Aus)
Bag - Betts (Aus)
Watch - Salvatore Ferragamo
Sandals - Shoeland (Ind)

With Love
Akanksha

Monday 22 August 2016

Estee Lauder Double Wear Stay-in-Place Makeup SPF 10 Foundation in 3W1 TAWNY Review

Hello Everyone...

Today, I am going to review Estee Lauder Double Wear Stay-in-Place Makeup SPF 10 Foundation in the shade 3W1 TAWNY which I am applying for more than 3 months (not everyday :p) and now I am able to give you guys my opinion on it. Every beauty guru  has raved about this foundation, so I couldn't resist getting my hands on it. Let's get started with the review :)

PACKAGING


The box in which the foundation bottle comes, is a beautiful metallic dark blue colored cardboard box and the name and information written on it is in golden color.The actual foundation/product comes in a transparent glass bottle with a gold colored metal cap - a very gorgeous packing <3. It doesn't come with a pump or an applicator. You have to take out the foundation by tilting the whole bottle (which I don't like in it as one cannot control the quantity to come out, fully).

PRICE
AUD 50/- for 30ml of product

INR 3000/- (approx.) for 30 ml of product

AVAILABILITY
Australia - You can easily get it from Myer or David Jones.

India - It is available at Sephora or some Shoppers Stop stores.

WHAT THE COMPANY CLAIMS
For all skin types. This remarkable lasting, yet lightweight makeup wears comfortably up to 15 hours, even in high humidity. Won't smudge or come off on clothes. Oil-free. Fragrance-free. Non-acnegenic. Dermatologist and Ophthalmologist tested.


MY VIEWS ON THIS FOUNDATION

Wearing Estee Lauder foundation in this
When I was watching the reviews videos on this foundation on youtube, most of the beauty gurus were saying that it is for oily skin beauties. When I went to Estee Lauder counter to buy it, the lady told me to buy some other foundation from their range if I have normal skin type. But I really wanted to try this one out, so I bought it finally ;). Believe me girls, as the company says, this foundation can be used by all skin types. It's just that if you have dry or normal skin, moisturize your skin really well before applying it and you are good to go :). This  foundation has medium to full coverage and still it is very lightweight. I never felt as if there is a heavy foundation sitting on my face. I like to apply it with a damp beauty sponge to give it a smooth finish. The maximum time duration I have kept it on my skin is 10 hours and trust me ladies, it didn't go anywhere. No patches, no fine lines even after 10 hours of application. And now I can easily say that I LOVE ESTEE LAUDER DOUBLE WEAR STAY-IN-PLACE MAKEUP :D 


       PROS 
  • Gorgeous and elegant glass bottle
  • Travel friendly
  • For all skin types
  • Long Lasting
  • Lightweight
  • Fragrance free
  • Medium to full coverage
  • Doesn't smudge
      CONS
  • Expensive
  • No pump or applicator in the bottle

OVERALL OPINION
If you are looking for a high coverage, lightweight and long lasting foundation, this is definitely a holy grail product for you guys ;)

RATING
5/5 


Friday 29 July 2016

Celebrity Inspired Make-Up Look Series - #6 Katrina Kaif In Kala Chashma Song

Hey Lovelies...

Have you watched the new song video Kaala Chashma from the movie Baar Baar Dekho? If not, you are missing something. Katrina is looking bomb in that song <3. And as I am in love with her look, I thought of doing an inspired make-up look. 


If you like this look and want to know how I did this, then keep on reading the post ;)

PROCEDURE

Let's start with the eye make-up. First, I prepared my eyes for the makeup by applying NARS Radiant Creamy Concealer all over my upper eye area. And then, applied a compact powder to set the concealer. This act as a base for my eye makeup :). Now, let's get started.


See the picture above. Eye shadow palette used in this tutorial is Estee Lauder Deluxe EyeShadow Compact.


Step 1 - I applied a light-medium brown color (1) all over my eye lids. And then blended it on the crease area with a blending brush.
Step 2 - On the same area i.e. the lid area, I applied the burgandy color (2) on top of the brown shadow and again blended well on the crease area.
Step 3 - Using Lakme Eyeconic Kajal in Black, I made a very thin line close to my upper lash line and a little on the outer curve.
Step 4 - I smudged the kajal with a smudge brush.
Step 5 - Now, I applied medium-dark brown color (3) on the outer-V part of the eyes and blended it well.


On my lower lash line, I first used eye shadow (1) all over that area and on top of that I applied eye shadow (2) and smudged them together with a smudge brush. Then, I applied the same Lakme kajal on my waterline and smudged it a little onto my lower lash line but closer to waterline.

I completed the look by applying Mascara on both upper and lower lashes, followed by fake eye lashes.

For face make-up :
Primer - Smashbox Photo Finish Foundation Primer
Foundation - Loreal Infallible 24H Stay Fresh Foundation in 150 Radiant Beige (check out its review here)
Concealer - Nars Radiant Creamy Concealer in Ginger 


Compact Powder - Lyric from Kat Von D Shade + Light Contour Palette (it's a yellow toned powder)
Bronzer - Bronze Goddess from Estee Lauder Deluxe All-Over Face Compact (just on the cheeks)
Blush - NYX Baked Blush in Pink Fetish (on top of the bronzer i.e. on my cheeks)
Highlighter - A mix of Essense Eyeshadow Duo in 07 Irresistable Fullmoon Flash and MAC Mineralize Skinfinish in Nuanced
Lip Gloss - Chi Chi Lipgloss in Crazy In Love
Sindoor - Divine Dew in 21 Love Drop

And with this, the look is complete. Here are some more pictures of this look :)


Hope you girls enjoyed this tutorial.See you all in my next post :* Don't forget to share your views on this look with me in the comment section below ;)

With Love
Akanksha