Sunday, 9 July 2017

Indian Wedding Look Book - July 2017

Hello Everyone...

I have come to India to attend cousin's wedding and sharing my outfits' pictures with you guys :)

DAY 1 - COCKTAIL


Dress - Forever New (Aus)
Bag - Aldo (India)
Footwear - Metro (India)

DAY 2 - ENGAGEMENT 


Saree - Kala Shree (Jal)

DAY 3 - WEDDING 


Dress - Polki (Jal)

So, these are the outfits I chose to wear at the functions. Hairstyles are done by Max 11 Salon and Makeup done by me ;).
Hope you all liked the post :*

With Love 
Akanksha

Saturday, 17 June 2017

Pastel in Winter

Hey Loves...

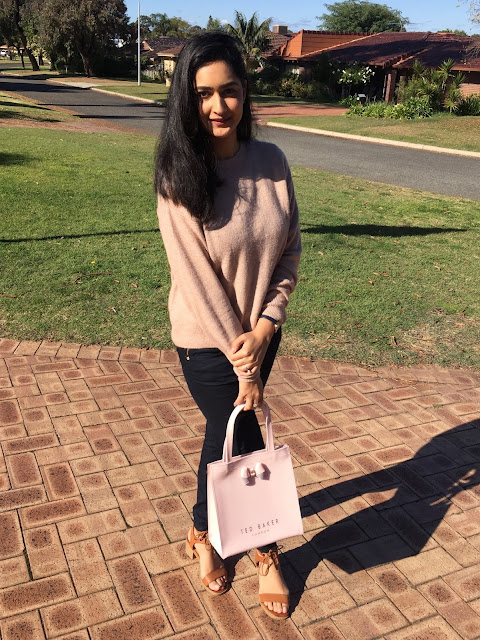
It's winter season in Australia and today it was a beautiful sunny day (which is very common in Perth :D). Nothing special in this post, just sharing the details of what I wore today.


OUTFIT DETAILS
Sweater - H&M Aus
Jeans - Only India
Handbag - Ted Baker 
Sandals - Famous Footwear 

So, this was a mini post just to share some pictures of my outfit of the day and its details :)
Hope you all like it.

With Love
Akanksha

Saturday, 6 May 2017

Short Dress With A Long Shrug - Fashion Post

Hey Everyone...

Hope you all are doing well. In this post, I am just sharing my outfit of the day. I like the way it turned out so thought to share it with you all. 


 So, the dress is a simple black one with buttons at the front and a collar. It has a fabric belt with it but I used that on top of the shrug.


The shrug is of military color and has a beautiful notched collar. 


It's an open shrug but I tied it with the fabric belt that came with the dress.


It was a summery look so, I paired it up with flats and also gave some color to the look by styling it with a maroon bag and lipstick.


These spectacles are just for the pics ;D


OUTFIT DETAILS

DRESS - DOTTI
SHRUG - TEMT
FLATS - FAMOUS FOOTWEAR
BAG - CHARLES KIETH
LIPSTICK - JEFREE STAR LIQUID LIPSTICK in UNICORN BLOOD


Hope you all liked this post. See you guys soon. Till then, take care.

With Love
Akanksha

Monday, 6 March 2017

Intense Smokey Eyes With A Dash Of Pink ft. Jeffree Star Beauty Killer Palette

Hello Loves...

Today, I am going to share an intense black smokey eyes look with a dash of pink color. I will be giving just the eye makeup tutorial. So, just want to suggest you guys to go for a full coverage base to make the eye look pop up. 


If you like the picture above then keep on reading.

PROCEDURE


The star of this post is this Jeffree Star Beauty Killer Eye Shadow Palette. I have used this palette for this look.


Step 1 - I prepared my eyes by first applying a concealer to even out the skin and then setting it with a compact powder to make a base for my eye makeup. Also, I stick tapes on the edges of my eyes to give a clean and sharp look to my eye makeup.

Step 2 - Applied the color Courtney on my crease area as well as a little above that using a blending brush and blended it well.

Step 3 - Next, I used the shade Star Power on the same area where I applied Courtney. Again blended the colors very well.

Step 4 - I took the color Black Rainbow and placed it all over my eye lids using a flat eye shadow brush. The colors in this palette are so pigmented that I didn't feel like applying any base for black eye shadow. 


Step 5 - Then, I took a small blending brush which was not so fluffy and blended the black color very gently on my crease area. I did it very slowly to blend the colors well together.

Step 6 - I took off the tapes from the sides and see how neat and sharp the sides look.

Step 7 - Coming to the lower lash line, I first applied the color Courtney using a blending brush and on top of that, I blended the color Star Power.

Step 8 - Then, I applied Kajal on my waterline and smudged it a little on my lower lash line using a smudge brush to give a smokey effect.

I completed the look by applying Mascara on upper and lower lashes, followed by Fake eyelashes. And with this, the look is complete.


Just remember that the key to a beautiful eye makeup is blending blending blending. So, take your time to blend the colors and do it slowly and gently.

Hope you like this tutorial. See you guys in my next post. Till then, take care.

With Love
Akanksha

Friday, 10 February 2017

Jeffree Star Velour Liquid Lipstick Review - Androgyny and Leo

Hello Loves...

Hope you all are doing good. I am a big fan of matte lipsticks and the liquid lipsticks have really changed the game. Liquid lipsticks are now available in almost all the brands. Recently, I purchased Jeffree Star Velour Liquid Lipsticks in the shades Androgyny and Leo. So, sharing my thoughts on those with you guys in this post.

Packaging


I am in love with its packaging. The bottle comes in a pink cardboard packaging with golden stars on it. A beautiful, girly color. Inside that packaging, comes a glass bottle/tube which is transparent and its cap is again the beautiful pink color with golden stars on it as you can see in the pictures above. Its wand is broad which I really like as it helps in applying the product in one go.

Availability
These are available online only. I got it from beautybay.com
You can also get it from the original jeffreestar.com or beautylish.com

Price
AUD 23 on beautybay.com
USD 18 

My Thoughts On Jeffree Star Velour Liquid Lipsticks

Let's talk about the colors first. Leo is a brown color which will look amazing on Indian skin tone.


Androgyny is a purple-pink kinda color as you can see in the pictures below.


The texture of these lipsticks is very smooth. I feel as if I am applying water on my lips, it is that light. Then, it settles down to be matte in a few seconds. It feels a little sticky for a few minutes but after that it is all good on lips. It is light weight but still you feel that something is on your lips. I don't know how but it makes my lips look fuller which I love about it. May be because of these particular colors or what but I am loving this effect. The colors are so pigmented that it just takes one slide of the wand and you are good to go. These are quite transfer-proof and stays on the lips for a very long time. I am so much in love with these liquid lipsticks that I am planning to buy some more colors now. These are my current favorite.

   
   PROS
  • Gorgeous packaging
  • Light weight
  • Highly pigmented
  • Broad wand helps in applying the color in one go
  • Makes lips fuller
  • Long lasting
  • Quite transfer-proof
  • Beautiful colors for Indian skin tone
  • Cruelty free, no animal testing
  • Vegan
  
    CONS
  • Can't find one 

Overall View
Jeffree Star Velour Liquid Lipsticks have become my current favorite. I would definitely suggest you guys to have it. You will love it. These are just amazing. 


Rating
5/5 


With Love
Akanksha


Wednesday, 8 February 2017

Wedding Guest Look

Hey Everyone...

In this post, I am sharing the look which you can wear as a guest on a wedding. A lot of my friends recently got married and this post is specially for them. I kept the eye makeup not so complicated. Hope you all like this makeup look.

Procedure

Step 1 - Clinique Dramatically Different Moisturizing Lotion


Step 2 - MAC Studio Finish Concealer in NW35 as a corrector under the eyes and around lips.


Step 3 - Born This Way Foundation in Warm Beige. Click here for the review


Step 4 - NARS Radiant Creamy Concealer in Ginger for highlighting.


Step 5 - E.L.F Loose Powder in Corrective Yellow for baking. I placed it on the areas where I applied the concealer and kept it there for 10 minutes. 


Step 6 - Maybelline Master Brow Pro Palette in Deep Brown


Step 7 - Urban Decay Naked Palette


In Step 1, I applied the shade Naked all over my eye lids as well as crease area and blended it well.
In Step 2, I applied the shade Buck on my inner and outer corners of eyes and blended it well, even on the crease area.
In Step 3, I put the shade Half Baked in the center of my eye lids and merged the sides with the Buck eye shadow. I applied it on inner corners of my eyes also.
In Step 4, I made a winged line on my eyes using Maybelline The Colossal Liner.
In Step 5, I first applied the shade Naked on my lower lash line, followed by the shade Buck.
Completed the eye look by applying NYX Wonder Pencil in the shade Medium on my water line and Too Faced Better Than Sex Mascara on my upper and lower lash line.  

Step 8 - Kat Von D Shade and Light Contour Palette

Used the first shade from bottom


Step 9 - NYX Baked Blush in Pink Fetish


Step 10 - For powder highlight, I used the shade Satin Sheets from Too Faced Chocolate Bon Bon Palette.

Step 11 - MAC Girl About Town Lipstick

Step 12 - MAC Prep plus Prime Fix plus to set the makeup.

And with this, the look is complete. I kept the eye makeup simple as sometimes we don't get enough time to do complicated eye looks. 


I hope this look is useful for you all. Let me know in the comment section below. See you all in my next post.

With Love
Akanksha